Let's assume you're starting on a brand new computer or operating system installation. These are the steps I would typically follow after I re-install Windows. Usually, I have several disks or possibly partitions on a single disk. This makes it easier to dual boot say Windows and Linux, but you may only have a single partition. Either way, the steps should be the same or similar though your paths will probably be different. For example purposes, I will act as though I'm on a new machine and will show you how I would typically go about setting up my project to continue development.
First, we need to download the tec8.jar library and the tec8_jars.jar dependencies. So do that first. Most browsers will put them into your Downloads directory within your user home directory. In my case, that is "C:\Users\Tim\Downloads". Once completed you should have the following files in your downloads directory...

Now, at this point, we can use WinRar or any other .zip file viewer to either extract the code or view it. I know that I wrote the code and it was transported to the computer over HTTPS, so I can be sure the files haven't been tampered with. It is possible that they may be corrupted in transport by the network or operating system, but that is fairly unlikely. Also, since I know that my Deploy utility is well tested, I can be fairly confident that the source .jar files are okay also, so I should be able to just extract the contents to a new directory and work from there.
In my case, I have a second partition which shows on Windows as the D: drive. I have hard-coded the F:\projects\ path as my projects home, so using the D: drive will force me to have to change the PROJECTS_HOME for illustration purposes. I will create the new projects directory in D:\java_prjs so that it is clear that the change has been made. In the next image, you can see that I have created the new PROJECTS_HOME dir and have copied the tec8.jar and tec8_jars.jar files to that directory.

Some programs work with the PROJECTS_HOME being unknown, for example CaptureTool and PropertiesViewer, however, it is more advisable to set the PROJECTS_HOME specifically to ensure that all other code is using the correct path. Also, I would assume that as a Java developer, you'll probably want to change the code in places at times, so I highly recommend unpacking the library into a project that you can edit, so I'll do that now. To keep things simple, I'm going to unpack to the same project name as the tec8.jar, so the final path will be D:\java_prjs\tec8\. Note that I specify folders and directories with a trailing File.separator. This helps me identify and differentiate directories from files and makes the construction of filenames from a directory name much simpler. The ca.tecreations.File class adds a File.separator if necessary, unless there is no way to know whether a name is a file or directory.
It is fairly quick to unpack the dependency jars in the same fashion and I will do that immediately after unpacking the library code since I use the dependencies almost immediately when running my programs. I have used the convention of putting the dependency jars in the project\jars\ directory and will continue with that pattern now. I am working to include "lib\" as another source for jars but I don't think that is complete yet.
The result from unpacking is as follows:

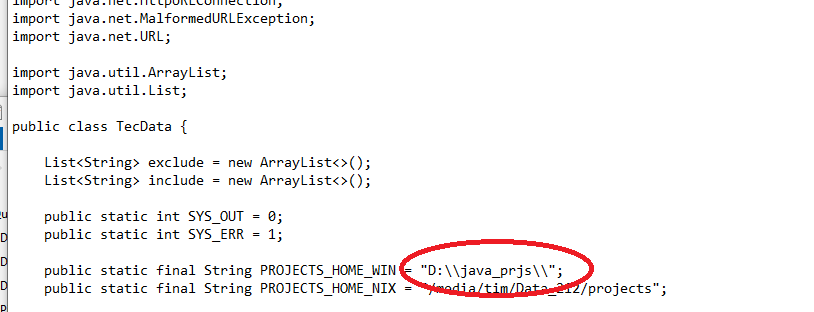
At this point, we can now change the ca.tecreations.TecData.java file contents to update the PROJECTS_HOME data. Using your platforms text editor, open the TecData.java file and set PROJECTS_HOME_WIN or PROJECTS_HOME_NIX to the appropriate path for your system, including the trailing backslash or foreslash, depending on your platform. Note that this is Java code, so for on Windows, you must escape the backslash with another backslash, hence there should be two in a row (\\), that is not a typo. See below.

At this point, you need to ensure that your PATH environment variable is set to your correct Java path and possibly, that your JAVA_HOME is set also. At a minimum you need the PATH and you can verify it is working with the "java --version" command. With that being done, we can now compile TecData.java and ProjectPath.java, and finally, run the JavaCompiler. Note that I am running these commands from within the D:\java_prjs\tec8\ directory, so the '.' expands to that path. We have to also compile ProjectPath because the bytecode doesn't know about the change we made in TecData. If we were running this inside an IDE, that probably wouldn't be necessary.
Note that this uses the properties inside of
From the output, you can see that the HelloWorld application needs to be in a project directory of its' own. At this point, you can compile in new projects or in the existing tec8 project, so you can see how fast you can get up and going to work in your projects. Ideally, you would use an Integrated Development Environment such as NetBeans or IntelliJ, or possibly, make your own. It's entirely up to you.

You'll probably run into bugs along the way, sorry about that. It's really a work in progress, but I am happy to integrate productive changes that don't break everything else. If you have something that does break everything, let me know. I'll try to work it in if it makes sense to.
But now, let's switch gears and accelerate your progress. Let's run FileTool and see what happens.
JavaCompiler is threaded, so until you exit the program through the SystemTray, it will remain running, so you can go ahead and close the DOS prompts for now and open a new one. This disconnects the output from the JavaCompiler though, so if at some point you find the JavaCompiler isn't running, (which happens if you hit an exception), go ahead and restart it, but hopefully I can show you an easier way... enter FileTool.
Check this out..., this is the command I'm going to run...

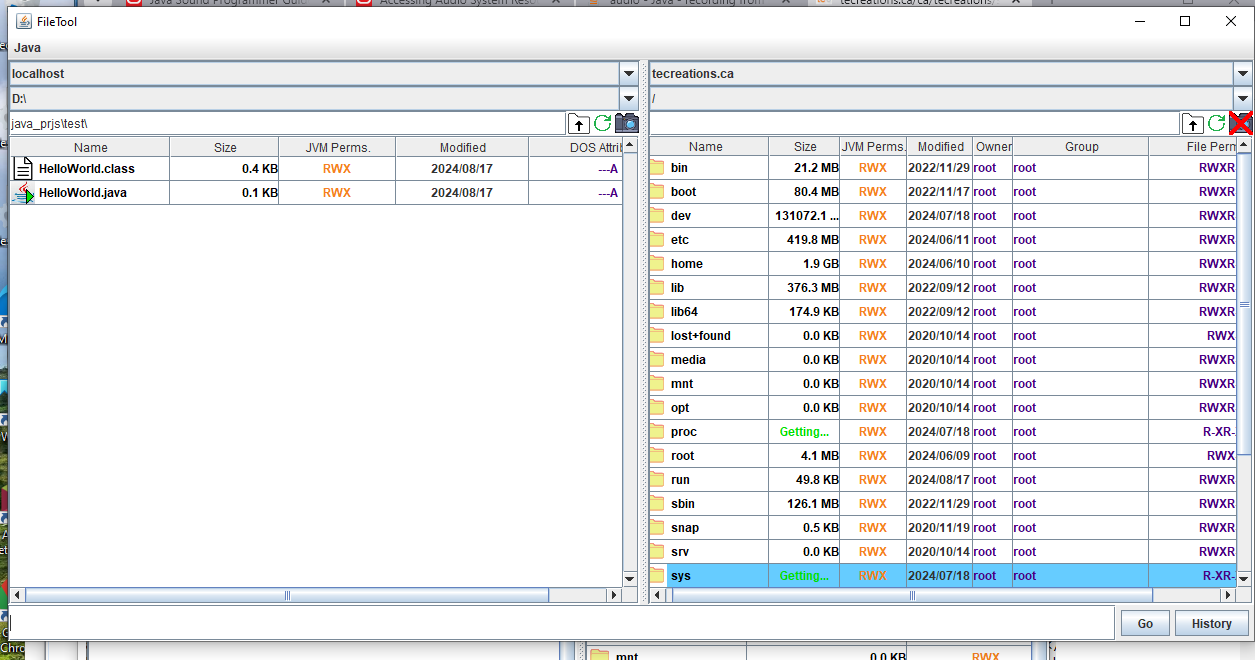
And this is what the FileTool looks like. You would need to configure the TLSServer for your VPS and have FileTool running on any machines in your local area network, but it gives you much greater control over your code and operations. It can compile over the network and even launch Java and other applications on your VPS or over the LAN and any computers that are not headless have access to the RemoteControl panel via the Screenshot button that looks like a camera. The purple parts are editable with a CTRL-Click. I run it as root, because PKI. -- Under Development

You can find tools to configure the PKI in ca.tecreations.net, along with the TLSServer code to figure out how to set it up on your end.
With the correct certificates, you could, in practice, allow anyone to access your networks securely, and do most anything.